Pre-holiday discount 10% - find the promo code

Nezapomněli jste na něco?

Nákupní košík

Your cart is empty. Let's do something about that :-)

HINT: Browse our new arrivals

At a loss? Check out our blog

How to make a silk scarf

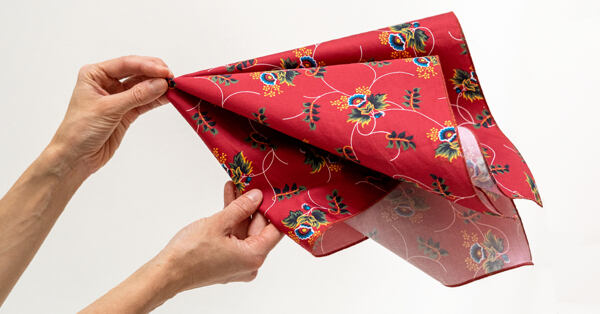
There’s no better way to start sewing with silk than making a silk scarf. It’s easier than you think. Learn a new skill and gain an elegant new accessory. Our easy, illustrated tutorial takes you through the process step by step.
How to make a silk scarf

You can use this tutorial to make any kind of scarf, whether you use pure silk or not. But making a scarf is a great way to get the knack of sewing with silk. The types of silk used for scarves are generally pretty easy for beginners to work with. Another plus is that this project doesn’t demand much material, so it shouldn’t be a shock to your pocketbook.

Pure, natural silk will give you stunning, vivid color the way no other material can. A silk scarf has so many uses: Tie it at your throat, wear it as a headband or a bow, braid it into your hair, knot it on a purse strap… in a pinch you can even make it into a carryall. It is also an original and ecological way to wrap presents; get inspired by the Japanese art of furoshiki, which has taken the humble practice of wrapping one’s things up in a sheet before trundling off to the public bath and elevated it to an elegant form of gift wrapping.

If you are an absolute beginner and don’t know where to start, never fear. We’ll walk you through this project every step of the way.

Choosing the right fabric

Scarves call for fine, flowy fabrics, nothing too stiff. A scarf to be used for furoshiki gift wrap or to be displayed, rather than worn, can be of sturdier fabric.

Chiffon and georgette

Airy fabrics like chiffon and georgette are perfect for dressy scarves and summer kerchiefs. In warm weather a scarf can be a priceless accessory – knotted loosely in your hair with nonchalant cool, pulled over your shoulders between dances. Make a note, however, that organza, though also sheer and lightweight, is really too stiff to make a proper scarf.

Habotai

If you’ve ever tried silk painting, your canvas was most likely a habotai scarf. Habotai is a light, moderately sheer fabric that’s wonderful for scarves – it’s easy to work with, you can get it in a broad palette of vivid colors, and it’s relatively inexpensive, so you can sew scarves in all colors of the rainbow and have one for every outfit and every mood. Habotai is also great for furoshiki. This is the ideal material to start with if you don’t have much experience sewing with silk.

Crepe de Chine

Crepe de Chine has a wonderful drape and is unbelievably touchable. Working with it can be a bit tricky, however. This is a lively fabric that can prove frustrating for a beginning sewer.

Serge

Silk serge, or twill, is the classic material for scarves. Those world-famous Hermès scarves are made of silk serge. It is woven with a twill weave, which gives the fabric a subtle, diagonal, textural stripe. Working with silk serge is less difficult than with crepe de Chine. A serge scarf is easy to fold and ties easily into all kinds of creative knots.

Satin

The fabulous gloss of a silk satin scarf comes from its satin weave. Satin scarves make pretty bows and are irresistible wrapped around the waist of a formal gown. However, satin is not often used for scarves for the very practical reason that it’s so smooth that it can’t really hold a knot and won’t stay put in your hair. Also keep in mind that sewing with satin is no walk in the park, so if you are just starting with silk you will want to steer clear. If you do choose satin, use a silk charmeuse, not a heavy duchesse, which is really too stiff for this purpose.

Voile

A silk-cotton voile is an ideal choice for your first scarf. It’s easy to work with, comes in vivid colors rivaling even habotai, and is the most economical material in our short list. A voile scarf can be tied any way you like and is suitable for furoshiki too. Its low price makes it our choice for those who have little experience sewing with silk.

Other materials for scarves

Scarves both for wearing and for furoshiki can also be sewn from cotton or rayon. We carry a select array of sustainable rayons and cottons that set themselves apart for one reason or another (hand printed, organic, dyed naturally). Choose a woven, rather than a knit, fabric. Try a light cotton sateen, poplin or muslin, lyocell, or any of our signature prints in EcoVero.

Scarves for furoshiki can also be made from brocade or linen. A brocade scarf can be a real stunner worn in your hair or tied to your handbag. While it may be too stiff to knot around your throat, it will look great on the strap of your purse or tucked into a breast pocket.

How much fabric you’ll need

Scarves come in all shapes and sizes. The choice is yours.

Neckerchief

A classic silk neckerchief comes in at around 20 x 20 inches (or 50 x 50 cm). Bandanas and other cotton scarves are a bit bigger, from 22 inches (56 cm) to 27 inches (68.5 cm).

Head scarf

A classic head scarf (picture yourself in a convertible with the top down…) can be as big as 60 inches to a side (150 cm). Those classy scarves from Hermès and Aspinal of London measure in at 35 x 35 inches (90 x 90 cm).

Shawl

Large scarves, usually of warmer material, to wrap around your shoulders on a chilly evening are generally 55 x 55 inches (140 x 140 cm).

Furoshiki scarves

The scarf size used for furoshiki naturally depends on the size of the gift. A square scarf 20 x 20 inches (50 x 50 cm) is common – and it can do double time as a neckerchief, headscarf, hairband, or bag ornament. Larger furoshiki scarves can be up to 31 inches (80 cm) or 37 inches (90 cm) on each side, small ones 16 inches (40 cm).

Some tips before you start

Seam allowance

When ordering fabric, don’t forget to add a seam allowance; a generous half inch (1.5 cm) on each side is usually enough. So for a 20-inch scarf, you’ll need a piece of fabric measuring 21 x 21 inches. When choosing fabric, always look at the bolt width; we carry fabric in widths from 27.5 to 55 inches (70 to 140 cm). So if you want to make a larger scarf, make sure the material you choose is wide enough.

Use extra fine pins for silk

The pins used for sewing with silk should be very sharp and should have a diameter of 0.4 mm or less. Like all tailor’s pins, they should have a glass head that you can iron over without doing any harm. Some good choices are:

  • Clover Patchwork Pins 0.4/36 mm
  • Flashpin Superfein 0.4/34 mm
  • Prym Superfine 0.4/35 mm

Best needles and thread for sewing silk

Sew with a universal No. 70 needle or a fine No. 60 needle (e.g. Schmetz Microtex 130/705 H–M 60; Prym Microtex 60).

With a No. 70 needle, use ordinary polyester thread, silk sewing thread (Amann 100% silk, Gütermann silk S 303) or an extra fine sewing thread (Gütermann Extra Fine M 202).

With a No. 60 needle, use only extra fine sewing thread.

How to make a silk scarf
The light green thread is extra thin M 202 from Gütermann, dark blue is an all-purpose thread. The machine needles below left are Microtex No. 60, on the right are standard No. 70.

Cutting fabric for a scarf

Cut a square of the desired size from the fabric of your choice, including the seam allowance (see the recommended seam allowance for each hem type).

Cotton and brocade are easy to cut, but fine, lively fabrics like habotai, crepe de Chine, and chiffon take more care. Press the fabric with an iron and lay it out on a large enough workspace. Straighten the edges using the edge of the table, the cutting pad, or a yardstick for reference. A handy trick for squirmy fabrics is to lay a sheet of tracing paper, a length of plain cotton canvas, a bedsheet, or a blanket underneath. Anchor the fabric in place with weights or pin it down, but be careful – for silk always use extra fine pins so that you won’t leave holes.

To mark silk, use white tailor’s chalk (colored chalk is harder to get out), a chalk pen, or a disappearing marker (test it first on a scrap of fabric to make sure it doesn’t leave a trace). Cut with a sharp pair of scissors (dressmaker’s shears) or a cutting wheel along a yardstick or other straight edge.

most common hems for scarves

There are several ways to finish the edge of a scarf. Here are the most common.

  • Narrow hem – best for fine fabrics
  • Hem with mitered corner – best for sturdier fabrics
  • Hand-rolled hem – traditional choice for silk scarves

This tutorial doesn’t cover an overlocked edge. If you have an overlock machine and you don’t mind having a visible finishing stitch around the edge of the scarf, you can edge your scarf with a narrow overlock or a rolled stitch. Settings differ depending on the model and can be found in your instruction manual.

Narrow hem

This method is great for finishing a scarf but you can also use it to hem any garment made of sheer material like chiffon, georgette, lightweight crepe, and charmeuse. Sometimes it’s called a “baby hem.”

This hem is sewn on a machine. You can do it by hand, but that is more time consuming.

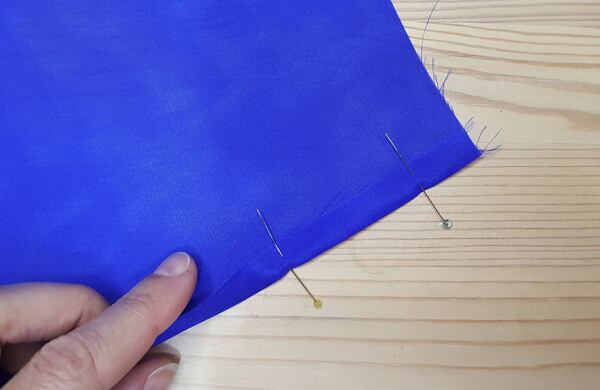
For this tutorial I chose habotai in electric blue.
How to make a silk scarf
Press the edge – For this type of hem, add a generous half inch (roughly 1.5 cm) on each side. Start with two opposite sides; fold the edge towards the back 3/8 inch (1 cm) and iron.
How to make a silk scarf
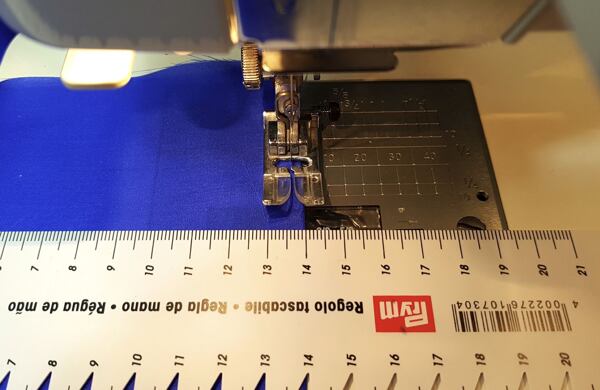
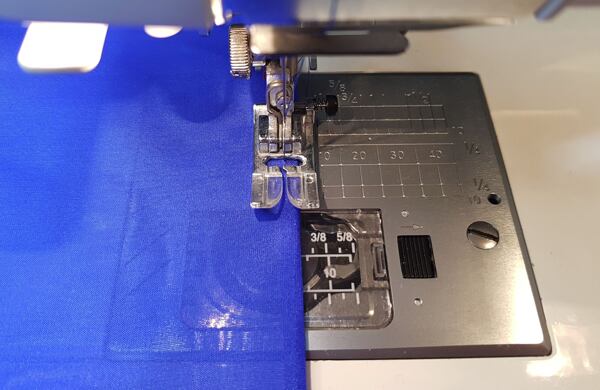
Sew very close to the fold – roughly 1/8 inch (3 mm) from the edge.
How to make a silk scarf
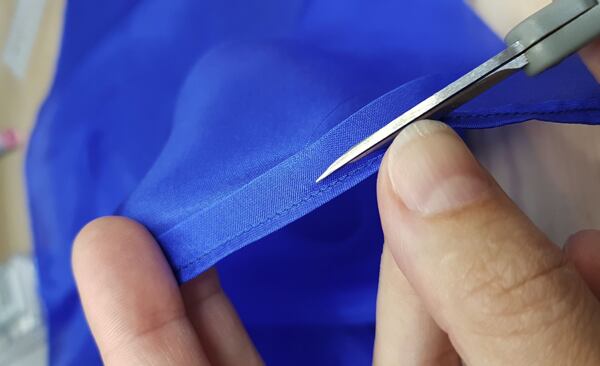
With a small pair of scissors, trim away the excess fabric very close to the stitch line. Be very careful not to cut through the underlying fabric – delicate fabrics damage easily.
How to make a silk scarf
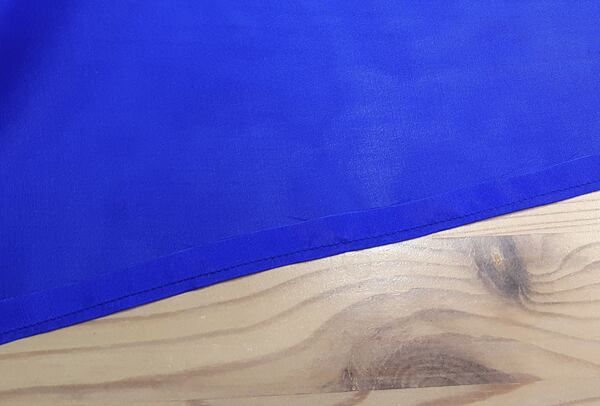
Now fold over again to hide the rough edge and press in place.
How to make a silk scarf
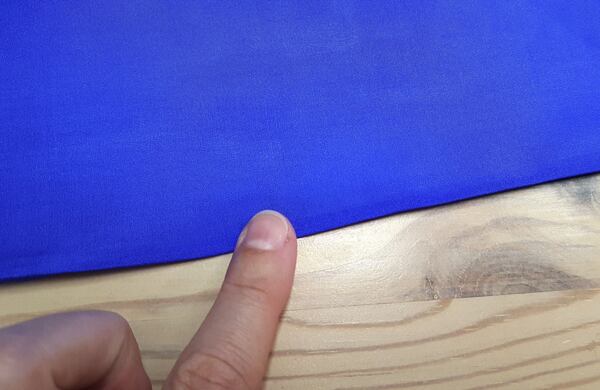
At this point there is no stitching visible on the front of the scarf, just the silhouette of the hem showing through from the back.
How to make a silk scarf
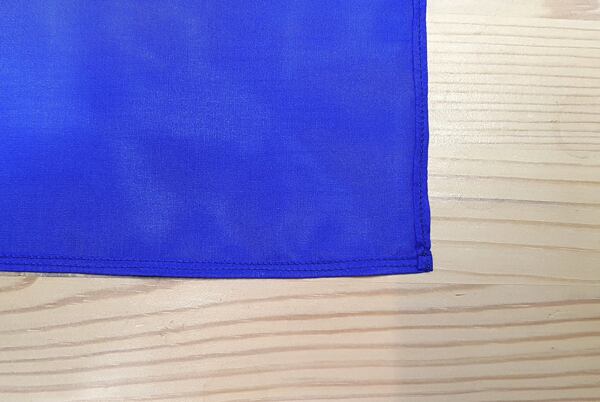
Sew along the hem again, this time from the front side, 1/8 inch (3 mm) from the edge. Try to lay your stitches along the stitch line you made previously. If you sew a bit farther in, you’ll have two visible stitch lines on the back of the scarf.
How to make a silk scarf
Either way is fine. Choose what you like better.
How to make a silk scarf
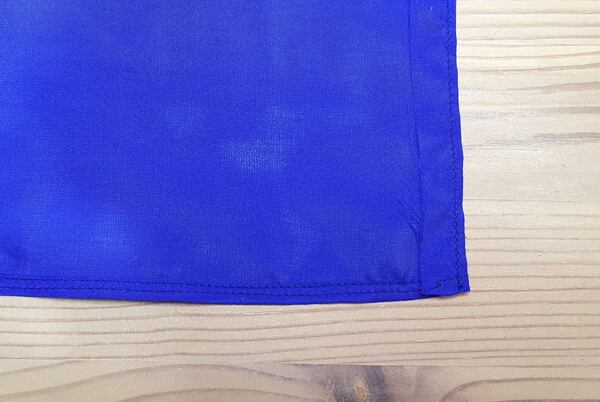
Having completed the two opposite sides of the scarf, it’s time to do the other two sides. Again, fold back 3/8 inch (1 cm), press, and sew right up against the edge.
How to make a silk scarf
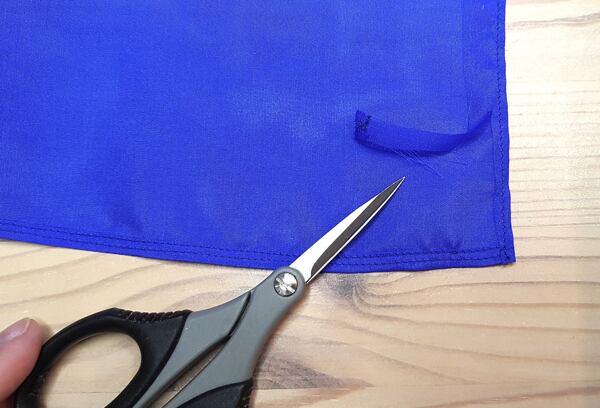
Trim away the excess fabric close to the stitch line, fold again, press, and sew. Be especially careful at the corners so that they fold over neatly. If you don’t want to risk sewing the corners by machine (when sewing so close to the edge, sometimes the feeder has trouble moving the fabric or the needle can push it down through the hole), stop just before the corner and finish the corners by hand.
How to make a silk scarf
The scarf is finished. Press all edges and corners again (habotai can be gently steamed if you like) and your scarf is ready to wear.
How to make a silk scarf

Hem with a mitered corner

This neat hem is best for scarves made of sturdier fabrics that hold their shape, such as cotton, linen, and brocade. You can also use it on a tablecloth or napkins with a wider hem.

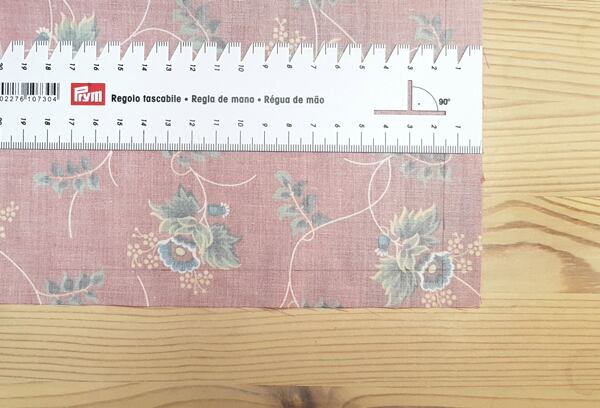
For this tutorial I chose a lightweight cotton sateen with a period print from our limited-edition collection. I have already taken the finished product out for a spin, and I have to say that it is really pleasantly soft to the touch and is just enough to keep off the chill. This scarf will be ideal for spring and autumn.
How to make a silk scarf
For this hem I also added a generous half inch (roughly 1.5 cm) for the seam on each side. Mark the seams on the back of the fabric all the way to the edge. For purposes of this tutorial I used a pencil to make the line more visible in the photos, but you should use tailor’s chalk or disappearing marker, especially if you are working with a light-colored fabric.
How to make a silk scarf
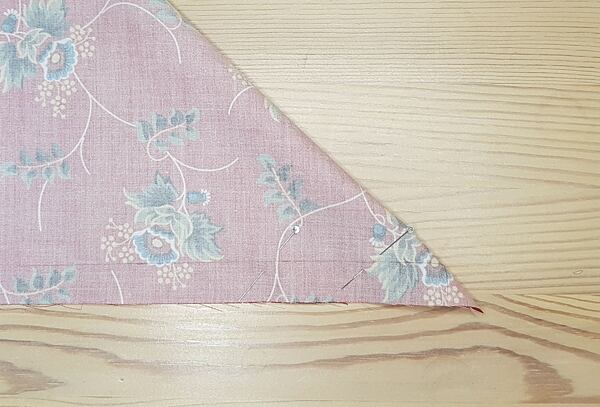
Fold the square along the diagonal.
How to make a silk scarf
Make a short line perpendicular to the fold from the spot where the seam allowance lines meet to the edge.
How to make a silk scarf
For exact results, use a drafting triangle, a small tailor’s square, or even the corner of a piece of paper… anything with a right angle.
How to make a silk scarf
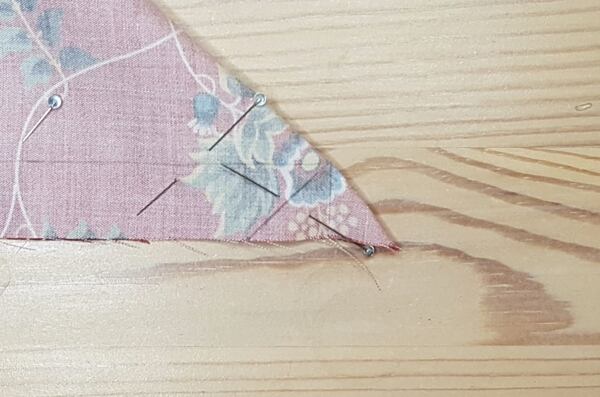
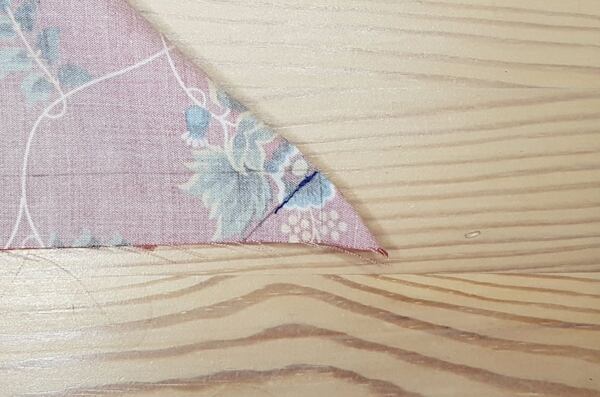
Sew 2/3 of the way along the line, stopping short of the edge.
How to make a silk scarf
Trim off the corner, cutting close to the stitches at the fold so that the corner will turn out nice and sharp.
How to make a silk scarf
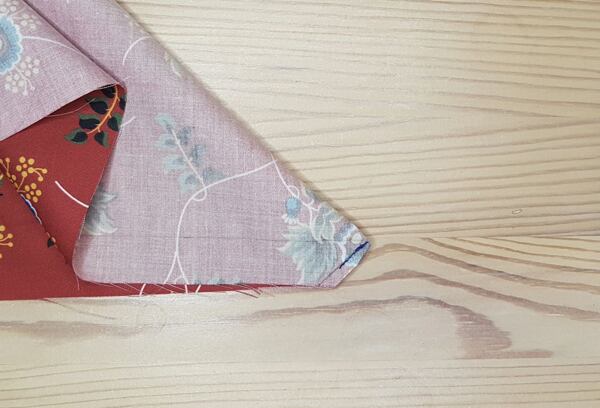
Unfold the scarf and turn the corner out.
How to make a silk scarf
Shape the point at each corner carefully (use a pointy tool, not too sharp, like a knitting needle). Press corners and hems all around with an iron.
How to make a silk scarf
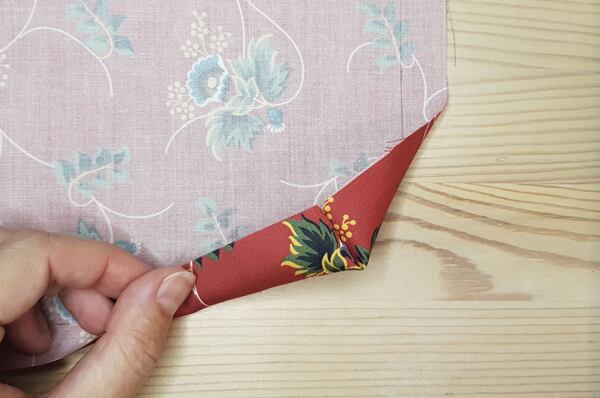
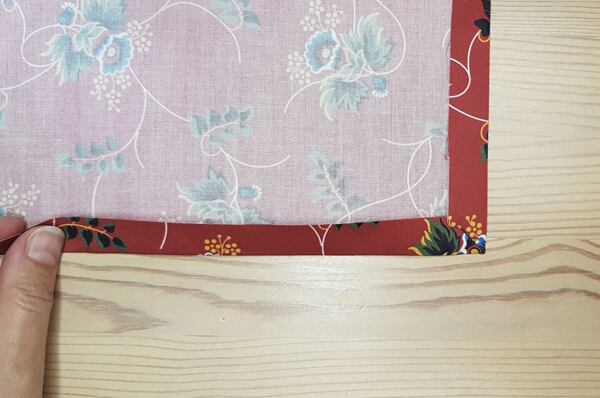
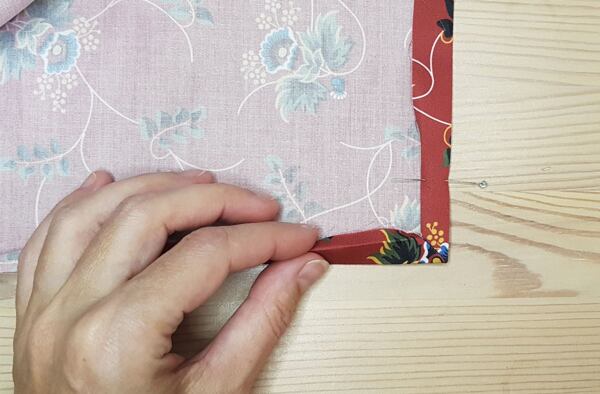
Fold under the rough edges of the seam allowance (this is why we sewed only 2/3 of the way to the edge) and press with an iron again.
How to make a silk scarf
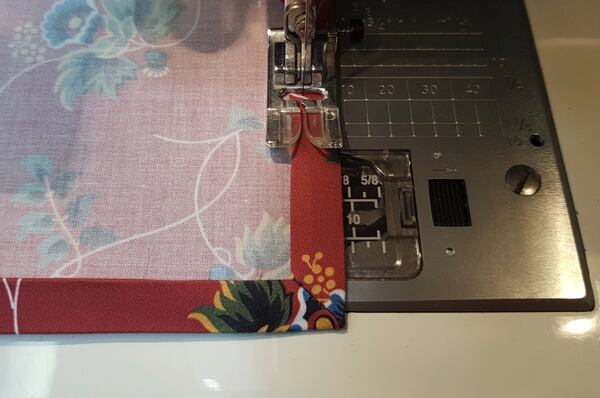
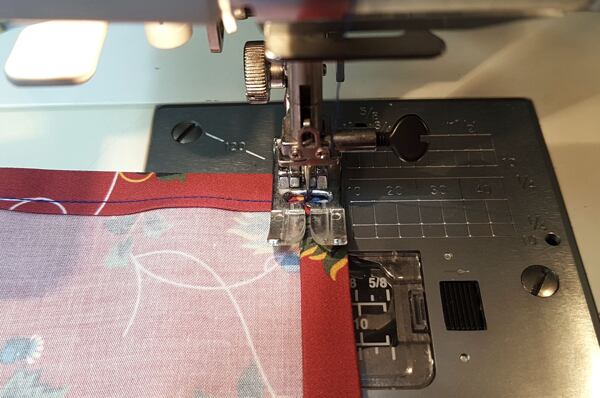
Now all you’ve got to do is machine-sew all the way around the hem. It makes no difference whether you sew the scarf from the back or front as long as your edges are even and you sew straight.
How to make a silk scarf
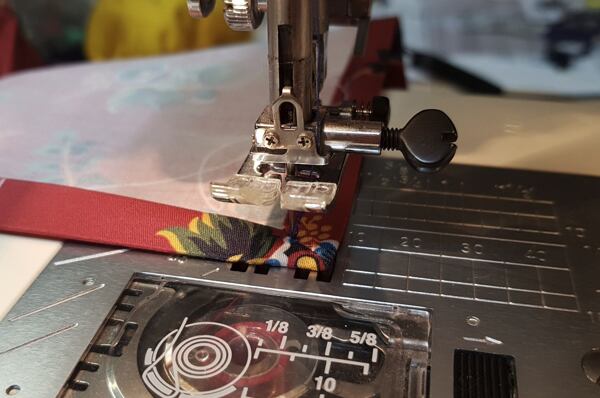
To make your corners neat, when you get to the diagonal seam at the corner, let down your needle and lift the foot.
How to make a silk scarf
Turn the piece around the needle by ninety degrees, put down the foot, and continue sewing.
How to make a silk scarf
If you don’t want visible stitching on the front of the scarf, you can hand-sew the hem from the back, catching the front of the scarf with tiny stitches. It is more work, but the result is a scarf that is entirely smooth on the front.
How to make a silk scarf
And we are done!

Hand-rolled hem

A rolled hem is used on silk scarves as well as for garments made of chiffon, georgette, habotai, and silk serge. The work is done by hand and requires some skill. Sewing proceeds from right to left, rolling back the edge with your left thumb and sewing with your right hand; if you’re left-handed, work in the opposite direction. It’s easier to sew if the rolled edge has some tension; this can be achieved by weighing the fabric down or pinning it to something.
How to make a silk scarf
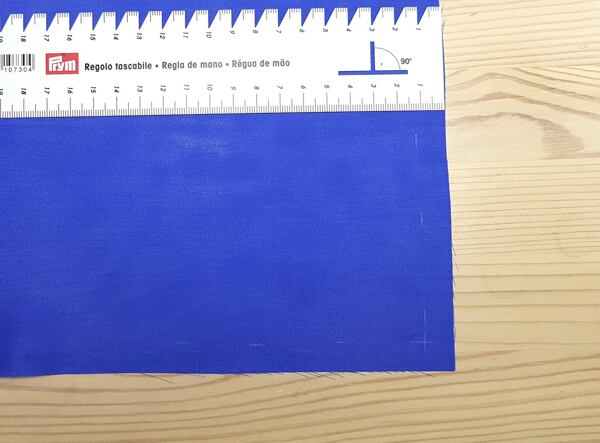
Lightly sketch a seam allowance of about half an inch (10–12 mm). This will serve as a guide as you roll the edge.

Start rolling the edge a couple of inches (5 cm) from the corner. Roll the edge of the fabric towards the back with your fingers. It takes a little practice, but you’ll soon get the hang of it (sometimes it helps to dampen your fingertips slightly, but not too much – you don’t want watermarks on the silk).

How to make a silk scarf
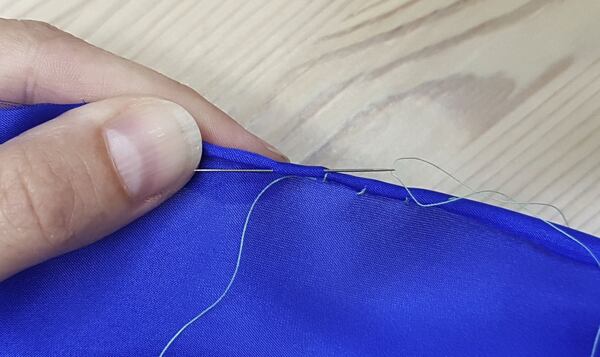
Sew with a fine, sharp needle and either ordinary polyester thread, extra-fine thread, or silk thread in a color matching your fabric. (For purposes of this tutorial I used a contrasting light green thread so that the stitching would be easier to follow.) Start by knotting your thread, tuck the needle into the roll and poke it out just above the back surface of the scarf. Take up just a couple of threads and pull the stitch through; this is the part of the stitch that will be visible on the face side.
How to make a silk scarf
Poke the needle back into the roll in about the same place that you pulled it out from. The length of the stitch inside of the roll should be about a quarter inch (8 mm) long. Poke out, pick up a couple of threads, pull through, and return the needle to the roll in the same place. Continue this way until you have a whole side done. At the beginning, your stitches may be a little irregular, but with practice you’ll get into a rhythm and they’ll look much nicer.
How to make a silk scarf
What about the corner? Sew almost up to the corner, then roll to the corner between your fingers and continue rolling onto the next side. At the corner there will be a double roll, but with thin fabric, that won’t matter.
How to make a silk scarf
Secure the corner with a couple of tiny stitches and continue sewing the next side.
How to make a silk scarf
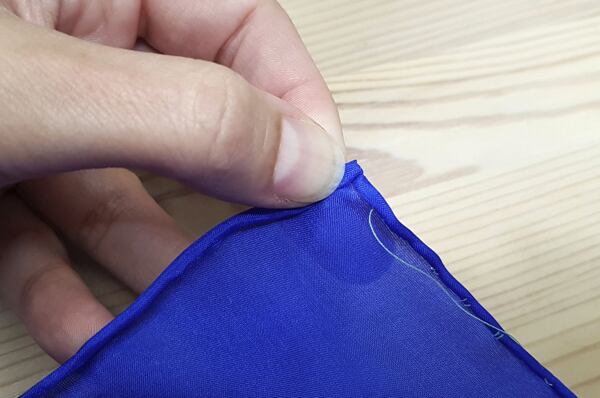
When you’ve finished, all that will be visible on the face side will be a row of tiny anchoring stitches. But if you have used a matching thread, these will barely be noticeable. For a hand-rolled hem, do not press the edge when you’re done. The main thing here is that the hem is light and supple, even if the edges and corners are not perfectly straight.
How to make a silk scarf
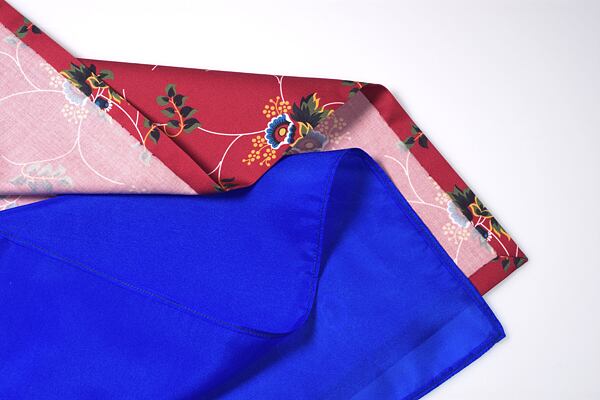
Now we’ve got two beautiful scarves to show for all our hard work – one in a vivid, diaphanous silk, the other in cotton with an authentic, period print. Which do you like better?

Show it off

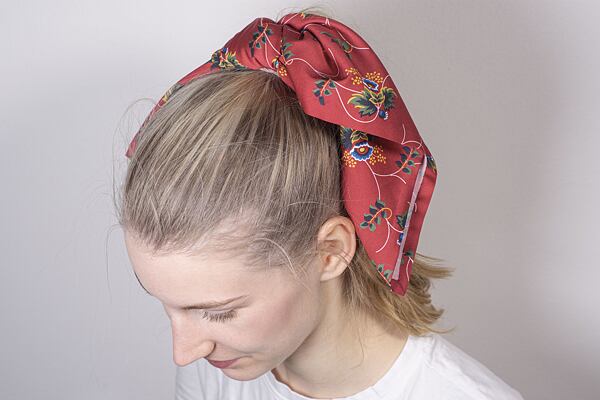
Now it’s time to take your fabulous new scarf out for a spin – tie it at your throat, wrap it over your hair, knot it on your purse strap – and enjoy the compliments (and envious gazes) of scarfless passers-by.

If you’ve never really had a thing for scarves, there are plenty of tips online for how to wear one. I especially love them in the spring and autumn, when the weather is a little too warm for a wooly, winter scarf, but the mornings can still be brisk. When it gets warm, I just tie my favorite scarf to my purse as a colorful accent.


Tip

Not so good at English? Just do an online search for “how to wear a silk scarf” or “how to tie a silk scarf” for lots of useful pictures and videos.


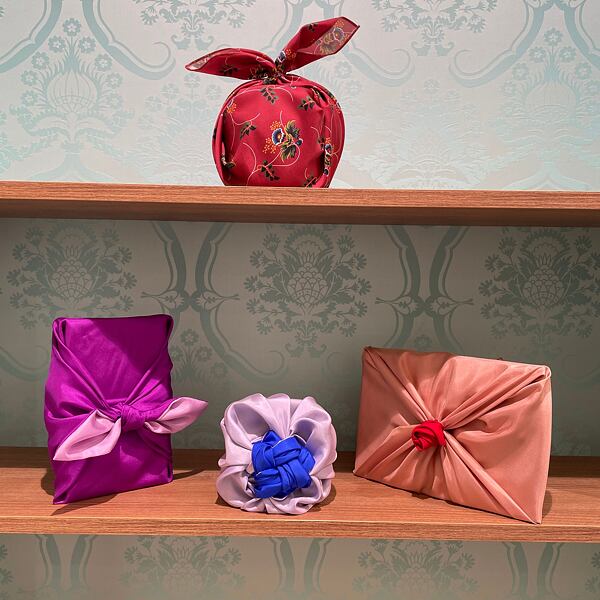
A scarf can also do double duty as gift and wrapping in one. For inspiration, look to the Japanese tradition of furoshiki. What’s nice is that the recipient can wear the scarf their gift was wrapped in, or use it to wrap a gift of their own and pass the tradition on.

You’ll find plenty of tutorials for furoshiki online. Scarves work nicely for boxes and books, but are especially useful for oddly shaped objects like bottles of wine or perfume, chocolate collections, and more; they conform to the shape of the item without tearing like tissue paper and they look great. Perfect!

How to make a silk scarf

What’s your favorite go-to scarf? 

Have you tried using a scarf to wrap a gift?

 Share in the comments. 

We’d love to know!

Proč šít hedvábný šátek

Tento návod můžete samozřejmě použít na ušití jakéhokoliv šátku na hlavu nebo na krk, nemusíte nutně sahat po přírodním hedvábí. Na druhou stranu je to ideální způsob, jak si šití s hedvábím vyzkoušet

Materiály na šátky vyloženě spadají do kategorie „hedvábí pro začátečníky“ a spotřeba není veliká, takže i vaše peněženka tento kousek luxusu unese.

Využijete ho nejen na parádu

Jemný a heboučký hedvábný šátek z pravého hedvábí vás odmění krásně živými barvami jako žádný jiný materiál. Hedvábný šátek má navíc spoustu využití:

  • můžete jej nosit na krku či přes ramena
  • uvázat jako čelenku nebo mašli
  • vplést do vlasů
  • ale také omotat kolem ucha kabelky jako ozdobu
  • nebo dokonce využít jako nouzovou taštičku
  • do šátku také můžete zabalit dárek v Japonsku se tomu říká furoshiki – dle původní tradice se do šátků balily potřeby do veřejných lázní, dnes se však tato dovednost využívá spíše na ekologické balení dárků, který jde ruku v ruce s trendem slow fashion.

Výběr látky na šátek

Na šátky na nošení se přirozeně hodí spíše jemnější, nepříliš tuhé látky

Trochu jinak je tomu u šátků na furoshiki (furošiki) nebo u těch šátků, které budete používat spíše jako doplněk než na nošení na krku. Takové šátky mouhou být i z pevných látek bavlněných nebo dokonce brokátů.

Vhodné látky na hedvábné šátky

Šifon a Žoržet

Lehoučké šifony a žoržety se hodí na letní nebo společenské šátky a šály. V létě je můžete volně uvázat na hlavu a proměnit se v elegantní Italku, k šatům je přehodíte přes ramena, než se zahřejete tancem. Organza, která je také lehká a průsvitná, se pro svou tuhost na šátek nehodí.

Habutaj

Jestli jste někdy zkoušeli malovat na hedvábí, dost možná jste si na to koupili právě šátek z habutaje. Tato lehká, mírně průsvitná látka je skvělý materiál na šátky: dobře se s ní pracuje, je k dostání v krásných, sytých barvách a není drahá, takže si můžete vyrobit šátečky třeba ve všech barvách duhy a střídat je podle nálady. Je též vhodný na furoshiki. Ideální materiál pro hedvábné začátečníky.

Krepdešín

Šátek z krepdešínu je krásně splývavý a na kůži neuvěřitelně příjemný. Práce s krepdešínem je ale spíš pro pokročilejší, je to „živá“ látka, která může být pro začátečníka poněkud frustrující.

Serž

Serž neboli twill je klasický šátkový materiál: proslulé značky, např. Hermès, šijí své slavné šátky právě ze serže. Serž je tkaný v keprové vazbě, která na látce vytváří jemné šikmé proužky. Práce se seržem je méně náročná než s krepdešínem. Seržové šátky se díky své struktuře dobře skládají a uvazují do různých kreativních uzlů.

Satén

Saténový šáteček nebo šála vypadají efektně díky saténové vazbě, která dodává látce maximální lesk. Saténový šátek se vyjímá dobře třeba jako mašle ve vlasech nebo uvázaný jako pásek na společenských šatech. Je třeba však dodat, že satén se na šátky běžně nepoužívá, protože je tak hladký a kluzký, že na něm špatně drží uzly a klouže ve vlasech. Také šití se saténem je náročnější a nehodí se pro úplné hedvábné začátečníky. Na šátek vždy vybírejte klasický satén, ne dyšes, který je příliš tuhý.

Voál

Směsový voál z hedvábí a bavlny je skvělý materiál na šátek: dobře se s ním pracuje, je cenově nejvýhodnější a má podobně krásné barvy jako habutaj. Voálový šátek se dá uvázat na všechny způsoby a lze ho použít i na furoshiki. Vzhledem k ceně asi nejlepší materiál pro hedvábné začátečníky.


Další vhodné materiály na šátky

Bavlna a viskóza

Šátek na nošení i na furoshiki ušijete také z bavlny nebo viskózy. V naší nabídce najdete především k přírodě šetrné druhy viskóz a něčím výjimečné bavlny (ručně tištěné, biobavlny, přírodně barvené apod.) Vybírejte vždy tkaninu, ne úplet – doporučujeme lehčí bavlněný satén, popelín nebo mušelín, lyocellové plátno nebo naše EcoVero s autorskými potisky.

Brokát a len

Šátek na furoshiki ušijete i z brokátu nebo lnu. Brokátový šátek bude skutečně krásný a lze jej nosit i jako doplněk do vlasů nebo na kabelku. Na krk se pro svou tuhost moc nehodí, ale na uchu kabelky – nebo v malém provedení v kapsičce pánského saka – bude vypadat úžasně.


Spotřeba látky na šátek

Šátky se vyrábějí v mnoha velikostech, volba rozměrů tedy záleží čistě na vás. 

Při koupi látky nezapomeňte přičíst přídavky na olemování – obvykle stačí 1,5 cm každé straně. Na šátek 50x50 cm tedy budete potřebovat 53x53 cm látky. 

Při výběru látky se vždy podívejte na údaj o její šířce, v naší nabídce máme látky v šířích od 70 do 140 cm. Chcete-li opravdu velký šátek, vyberte dostatečně široký materiál. 

Podle toho, jak budete chtít šátek nosit, zvolte jeho velikost:

Šátek na krk

Klasické šátky na nošení na krku se obvykle vyrábějí v rozměrech od 50x50. Bavlněné šátky, které se prodávají v galanteriích – takové ty obyčejné s puntíky, kašmírovým potiskem nebo lebkami – bývají cca 70x70 cm velké.

Šátek na hlavu

Klasické šátky na nošení na hlavě se obvykle vyrábějí v rozměrech do 150x150 cm. Šátky Hermès nebo Aspinal mají rozměry 90x90 cm.

Šátek na ramena

Velké šátky z hřejivějších materiálů, které lze naaranžovat na ramena, mívají velikost 140x140 cm.

Šátek na balení dárků

Velikost šátku na furoshiki se samozřejmě řídí velikostí baleného dárku. Obvyklý rozměr je 50x50 cm, který lze nosit i jako malý šáteček na krku, ve vlasech nebo na kabelce. Větší furoshiki šátky mívají stranu o délce 80–90 cm, malé třeba jen 40 cm.


Špendlíky, jehly a nitě

Ještě než se pustíte do (vaší možná první) práce s hedvábím, malá vsuvka na téma jehel a nití. Hedvábí, zvláště některé jeho druhy jako satén nebo šifon (ty začátečníkům nedoporučuji), je velmi jemná látka. Je vhodné tedy používat i jemné nitě, špendlíky a jehly, aby vám po nich v látce nezůstaly vpichy.

Tenké špendlíky na hedvábí

Špendlíky na hedvábí by měly mít průměr drátku maximálně 0,4 mm, měly by být ostré a jako všechny krejčovské špendlíky by měly mít skleněnou hlavičku, kterou můžete bez úhony vyžehlit. Vhodné špendlíky jsou například

  • Clover Patchwork Pins 0.4/36 mm
  • Flashpin Superfein 0.4/34 mm
  • Prym Superfine 0.4/35 mm

Jehly a nitě na šití hedvábí

Při šití použijte univerzální jehlu č. 70 nebo tenkou jehlu č. 60 (například Schmetz Microtex 130/705 H-M 60; Prym Microtex 60).

Pro šití jehlou č. 70 navlékněte běžnou polyesterovou šicí nit, hedvábnou šicí nit (Amann 100 % Silk, Gütermann Silk S 303) nebo extra tenkou šicí nit (Gütermann Extra Fine M 202).

Při šití jehlou č. 60 používejte pouze extra tenkou šicí nit.

Světle zelená nit je extra tenká M 202 od Gütermannu, tmavě modrá je univerzální šicí nit. Dole vlevo jehly microtex č. 60, vpravo běžné univerzální/standard jehly č. 70.

Jak látku správně střihnout

Z vybrané látky vystřihněte čtverec požadovaných rozměrů s přídavkem na olemování (konkrétní přídavek uvádím u každé metody zvlášť).

Látku vyžehlete a rozložte si ji na dostatečně velké ploše. Okraje srovnejte do rovna podle kraje stolu, řezací podložky nebo přiloženého pravítka. Dobrým trikem pro „utíkavé“ látky je podložit je střihovým papírem, bavlněným plátnem (např. prostěradlem) nebo dekou. 

Látku si upevněte těžítky nebo přišpendlete, ale pozor: na hedvábné látky vždy používejte speciální tenké špendlíky, které nezanechají dírky.

Na značkování na hedvábí použijte krejčovskou křídu bílé barvy (barevná křída se špatně odstraňuje), křídu v tužce nebo mizící fix – ten ale doporučujeme vyzkoušet předem na odstřižku, jestli půjde opravdu beze stopy odstranit. 

Stříhejte ostrými krejčovskými nůžkami nebo řežte řezacím kolečkem podle pravítka.


3 nejvíce používané lemy šátků

Existuje několik způsobů lemování šátků. Ukážeme si ty nejvíce používané:

Nezmiňuji lemování na overlocku. Pokud tento speciální stroj máte a nevadí vám viditelný obnitkovací steh na okraji, můžete si šátek obšít tenčím overlockovým nebo zarolovaným stehem. Nastavení je pro každý konkrétní stroj jiné a najdete ho v návodu.

tenký založený lem

Tento způsob se používá nejen na lemování šátků, ale i na lemy oděvů z tenkých látek jako jsou šifony, žoržety nebo lehké krepy a satény. Říká se mu také „baby hem“. Lem se šije na stroji. Je možné ušít jej i ručně, ale bylo by to dost časově náročné.

Na ukázku jsem vybrala zářivě modrý habutaj.

Jak ušít šátek
Zažehlete okraje – na tento druh lemu přidejte na každý okraj cca 1,5 cm. Na dvou protilehlých stranách zažehlete okraje 1 cm do rubu
Jak ušít šátek
Lem prošijte velmi těsně u linie přeložení – cca 3 mm od ní.
Jak ušít šátek
Malými nůžkami odstřihněte kraj velmi těsně vedle linie šití. Pozor, ať si neprostřihnete líc šátku – jemné látky se poškodí velmi snadno.
Jak ušít šátek
Nyní okraj znovu zahněte do rubu a přežehlete.
Jak ušít šátek
Na lícové straně teď není vidět žádné šití, jen mírně prosvítající lem v rubu.
Jak ušít šátek
Lem prošijte znovu, tentokrát z lícové strany, opět jen pár milimetrů od okraje. Pojedete-li jehlou ve stejné vzdálenosti, v jaké je šití z rubu, budou se obě linie šití na rubu překrývat. Můžete jet o kousek dál, potom budete mít na rubu dva švy vedle sebe.
Jak ušít šátek
Obě možnosti jsou stejně funkční, záleží jen na vás, která se vám líbí víc.
Jak ušít šátek
Po olemování dvou protilehlých stran olemujte zbývající dvě strany. Opět je přeložte 1 cm do rubu a prošijte těsně od kraje.
Jak ušít šátek
Sestřihněte okraj těsně k šití, ohněte ještě jednou do rubu, zažehlete a z líce prošijte. V rozích šijte pečlivě, aby byly růžky pěkně přiložené na sebe; nechcete-li riskovat šití na stroji (při šití takhle blízko u kraje někdy patka nezvládá látku posouvat, nebo ji jehla zatlačí do otvoru v desce), došijte těsně před roh, nechte si delší konce nití a dokončete růžek ručně.
Jak ušít šátek
Šátek je hotový. Přežehlete všechny okraje a rohy (habutaj můžete i jemně napařit) a můžete šátek hned nosit.

Lem s obráceným rohem

Tento lem je vhodnější na šátky z pevnějších látek, které dobře drží tvar: bavlny, lny, brokát. Můžete si takhle olemovat nejen šátek, ale třeba i ubrus – stačí jen udělat širší lem.

Na ukázku jsem vybrala lehký bavlněný satén s historickým vzorem z naší limitované edice. Hotový šátek jsem vyzkoušela a musím říct, že je na kůži opravdu příjemný, a přitom zvládne lehce zahřát; na jaro nebo na podzim bude skvělý.

Jak ušít šátek
Na tento lem jsem si také připravila přídavky o šířce 1,5 cm na každé straně. Přídavky si narýsujte na rubu a protáhněte je vždy až k samému okraji látky. Já jsem kvůli lepší viditelnosti linky nakreslila tužkou, vy si je ale nakreslete krejčovskou křídou nebo mizícím fixem, jak jsem doporučovala v úvodu článku, zvlášť jestli jste na šátek vybrali světlou látku!
Jak ušít šátek
Šátek nyní přeložte diagonálně napůl.
Jak ušít šátek
V rohu si narýsujte krátkou čárku, která bude kolmá k šikmé linii přehybu a bude končit tam, kde se sbíhají zakreslené linie přídavků.
Jak ušít šátek
Nejpřesněji tuto čárku nakreslíte s pomocí starého dobrého rýsovacího trojúhelníku, ale můžete použít i malé krejčovské pravítko nebo roh listu papíru – cokoli, co vám dovolí zakreslit pravý úhel.
Jak ušít šátek
Růžek po této linii prošijte, nešijte ale úplně do kraje – stačí cca do dvou třetin kolmice.
Jak ušít šátek
Roh odstřihněte, směrem k budoucí špičce stříhejte až skoro k šití, aby šla pěkně obrátit.
Jak ušít šátek
Šátek rozložte a sešitý roh otočte naruby.
Jak ušít šátek
Špičku rohu pěkně vytvarujte (můžete použít špičatý, ale ne ostrý předmět – pletací jehlici, roh rýsovacího trojúhelníku) a zažehlete ji spolu s přídavky.
Jak ušít šátek
Nezačištěné okraje přídavků podehněte dospodu (proto jsme si růžek nechali na konci nedošitý) a ještě jednou zažehlete.
Jak ušít šátek
Zbývá obšít šátek kolem dokola na stroji. Je jedno, jestli budete šít po rubu nebo po líci, pokud máte přídavky pěkně pravidelné a budete šít rovně, nemělo by vám zpod jehly nic utéct.
Jak ušít šátek
Malý tip pro pěkné rohy: až došijete přesně na šikmý šev v rohu, spusťte jehlu dolů a zvedněte patku.
Jak ušít šátek
Otočte látku kolem jehly o devadesát stupňů, spusťte patku a můžete šít dál.
Jak ušít šátek
Kdybyste nechtěli, aby bylo na lícové straně šátku viditelné šití, můžete lem na rubu přichytit ručně drobnými stehy. Je to pracnější, šátek je pak ale na líci hladký.
Jak ušít šátek
A je hotovo!

Ruličkový lem

Ruličkový lem se používá na hedvábné šátky, ale i oděvy z látek, jako jsou šifony, žoržety, habutaje nebo serže. Šije se ručně a vyžaduje určitou zručnost. 

Při šití se postupuje zprava doleva, levým palcem si rolujete okraj a pravou rukou přišíváte; leváci postupují opačně. Je vhodné, aby byl rolovaný okraj trochu napnutý. Toho nejlépe docílíte tak, že látku něčím zatížíte nebo k něčemu přišpendlíte.

Jak ušít šátek
Na látce si lehce vyznačte okraj o šířce zhruba 10–12 mm. Bude sloužit jako vodítko, abyste rolovali stále stejný kousek látky.

Začněte rolovat kousek (asi 5 cm) od rohu, prsty pomalu ohýbejte okraj do rubu a snažte se ho zarolovat. Chce to trochu cviku, ale jakmile se vám to podaří, už vám to půjde lépe (můžete si lehce navlhčit prsty – ne namočit, ať si na hedvábí neuděláte skvrny!).

Jak ušít šátek
Na šití si vezměte tenkou, ostrou jehlu a buď běžnou polyesterovou šicí nit, extra tenkou nit nebo hedvábnou nit v barvě co nejbližší šátku. Já jsem pro lepší viditelnost zvolila světlou nit. Udělejte uzlík, strčte jehlu do ruličky a vypíchněte z ní ven těsně nad rubovou plochou šátku. Naberte asi tak dvě nitky látky a prošijte; to je část stehu, která bude vidět na lícové straně.
Jak ušít šátek
Vpíchněte jehlu zpět dovnitř ruličky, a to ve stejném místě (nebo těsně vedle něho), ze kterého jste předtím jehlu z ruličky vytáhli. Steh uvnitř ruličky by měl být dlouhý cca 8 mm. Znovu naberte dvě nitky, protáhněte nit, vraťte se dovnitř ruličky a tak dále, až budete mít olemovanou celou stranu. Ze začátku budou stehy nejspíš dost nepravidelné, ale až získáte určitý rytmus, budou vypadat mnohem lépe.
Jak ušít šátek
Jak se šijí rohy? Došijte těsně před roh, dorolujte až do něj a potom začněte rolovat začátek následující strany. V růžku tak bude zarolováno dvojitě, ale na tenké látce to nijak nevadí.
Jak ušít šátek
Růžek zajistěte dvěma drobnými stehy a pokračujte v šití dál.
Jak ušít šátek
Na lícové straně budou jen drobné tečky přichycovacích stehů. Pokud budete šít nití v barvě šátku, nebudou prakticky vidět. Ručně rolovaný šátek se po olemování nežehlí. Okraje ani rohy nejsou dokonale rovné, lem je ale lehký a vzdušný.
Jak ušít šátek
Máme hotové dva krásné šátky, jeden z lehoučkého, sytě barevného hedvábí, druhý z jedinečné bavlny s historickým potiskem. Který se vám líbí víc?

Odvažte se

Zbývá už jen uvázat si svůj krásný nový šátek na hlavu, na krk nebo na kabelku a kochat se obdivnými pohledy kolemjdoucích. Nebojte se s vázáním šátku experimentovat. 

Na internetu najdete spoustu návodů na vázání a nošení šátků. Já ráda nosím šátky na jaře a na podzim, kdy není počasí na teplou šálu, ale rádo chladně pofukuje. Je-li teplo, putuje šátek na kabelku jako barevný doplněk.


TIP

Nevládnete angličtinou? Nevadí – zadejte do vyhledávače „how to wear a silk scarf“ nebo „how to tie a silk scarf“ a najdete spoustu názorných obrázků a videí.


Balení dárků do látek

Do šátku také můžete po vzoru japonské tradice furoshiki zabalit dárek. 

Obdarovaný tak vlastně dostane dárky dva: šátek si může nechat a nosit, nebo do něj také někomu zabalit dárek a předat tradici dál. 

Návodů na furoshiki najdete na internetu plno. My jsme pro vás připravili 3 – zabalíte s nimi knížku nebo krabičku, ale díky tvárnosti látky, která se nebude mačkat – nebo dokonce trhat – jako papír, i tvarově nepravidelné dárky jako láhev, flakonek parfému nebo kulatou bonboniéru.

Jak ušít šátek
Jak ušít šátek
Jak ušít šátek

Máte svůj oblíbený šátek, který často nosíte? 

Zkoušeli jste někdy zabalit do šátku dárek? 

Napište nám do komentářů, zajímá nás to!

Comments(3)

Sheila Jacklin 16 / 7 / 2024

Thank you for a very clear tutorial. I have some Liberty silk to turn into a scarf.

1 response hide responses
Marcela 1 / 8 / 2024

Reaction to: Thank you for a very clear tutorial. I have some Liberty silk to turn into a scarf.

Liberty prints are exquisite. Show us the result! It will be splendid for sure.

Jenessa B. 20 / 5 / 2024

Love this! If you wanted to make a silk twilly, would you add interfacing?

1 response hide responses
Marcela 25 / 6 / 2024

Reaction to: Love this! If you wanted to make a silk twilly, would you add interfacing?

Hi Jenessa. For silk twilly an interfacing is not a must, or lets say it this way - it depends, how do you want your twilly to fall. If a flowing falling twilly is desired, then we would not add anything. If on the other hand you aim for a slightly structured look, then you could use either lightweight fusible interlining or fusible interfacing for silk (we offer both most of the times).

Emily Flowers Flowers 16 / 3 / 2024

A beautiful article. Just what I was looking for.

1 response hide responses
gabi 26 / 6 / 2024

Reaction to: A beautiful article. Just what I was looking for.

Thank you!

Get Sartor in your inbox

Subscribe to our newsletter and feed your creativity. You won't get any spam from us, just the sort of interesting and informative content that we'd like to receive ourselves.

By registering you agree to the processing of your personal data

Contact form close
Načíst

Got a question? A dilemma?

(+420) 777 511 114
support@sartorbohemia.com

Language

Currency

Cookies

We use cookies for the proper functioning of this e-commerce shop, to adapt the site content to your needs, for statistical and marketing purposes and to personalize advertisements from Google and other companies. By clicking "Accept All", you consent to their collection and processing, and we will provide you with the best shopping experience.

Your cookies settings

Here you can enable cookies according to your own preferences.You can change those settings any time in the future by clicking 'Cookie settings' link in our website's footer.

Necessary cookies help make a website usable by enabling basic functions like page navigation and access to secure areas of the website. The website cannot function properly without these cookies.

Preference cookies enable a website to remember information that changes the way the website behaves or looks, like your preferred language or the region that you are in.

Statistic cookies help website owners to understand how visitors interact with websites by collecting and reporting information anonymously.

These cookies are used by advertising and social networks, including Google, to transmit personal data and personalise ads to make them interesting to you.